Category Archives: Leftovers

Simple poncho!

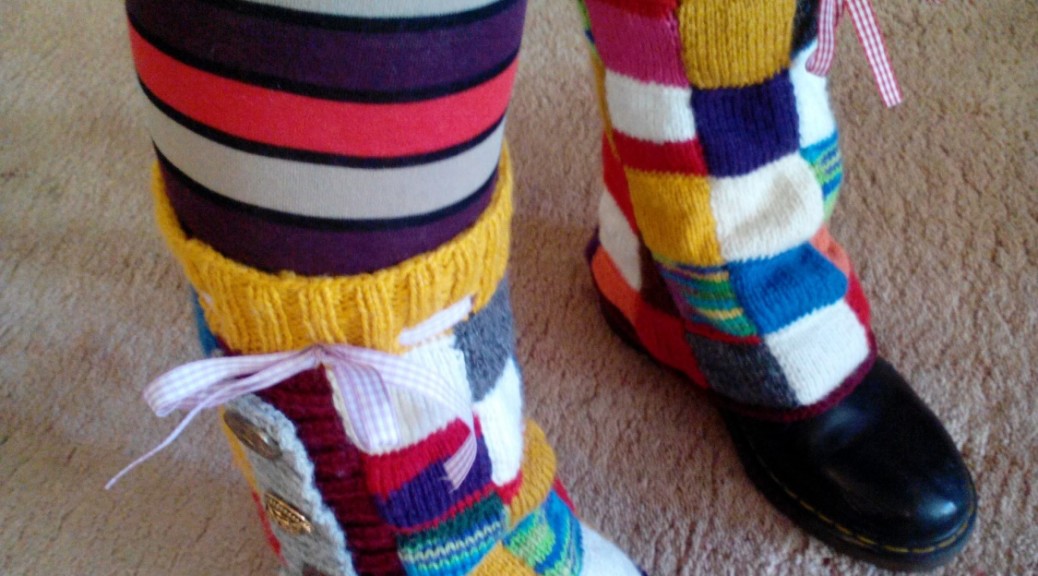
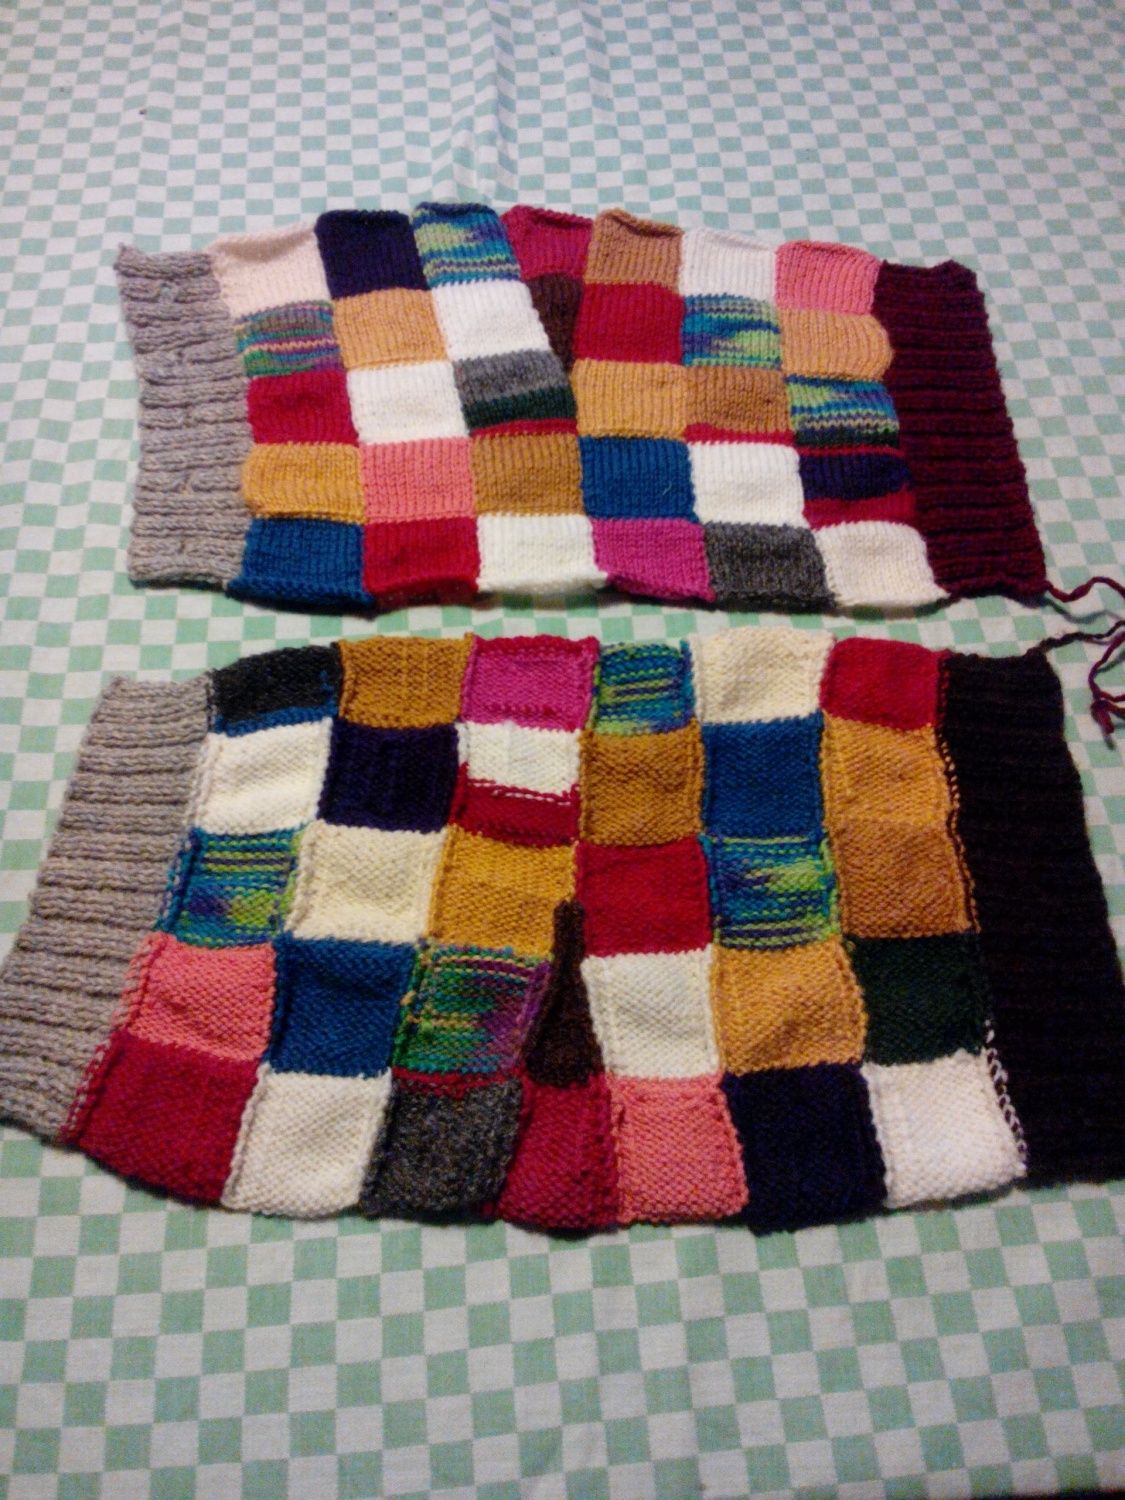
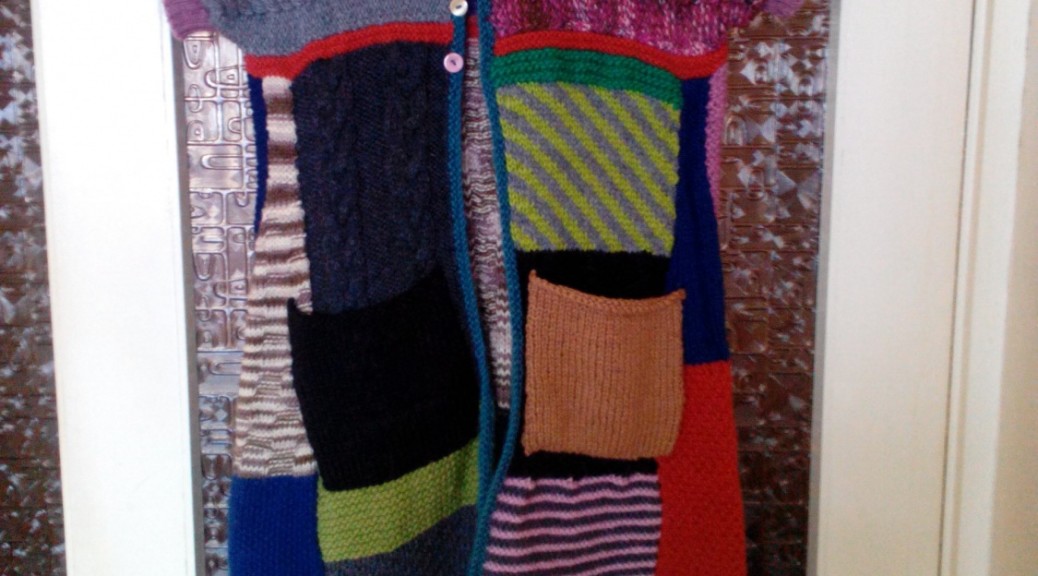
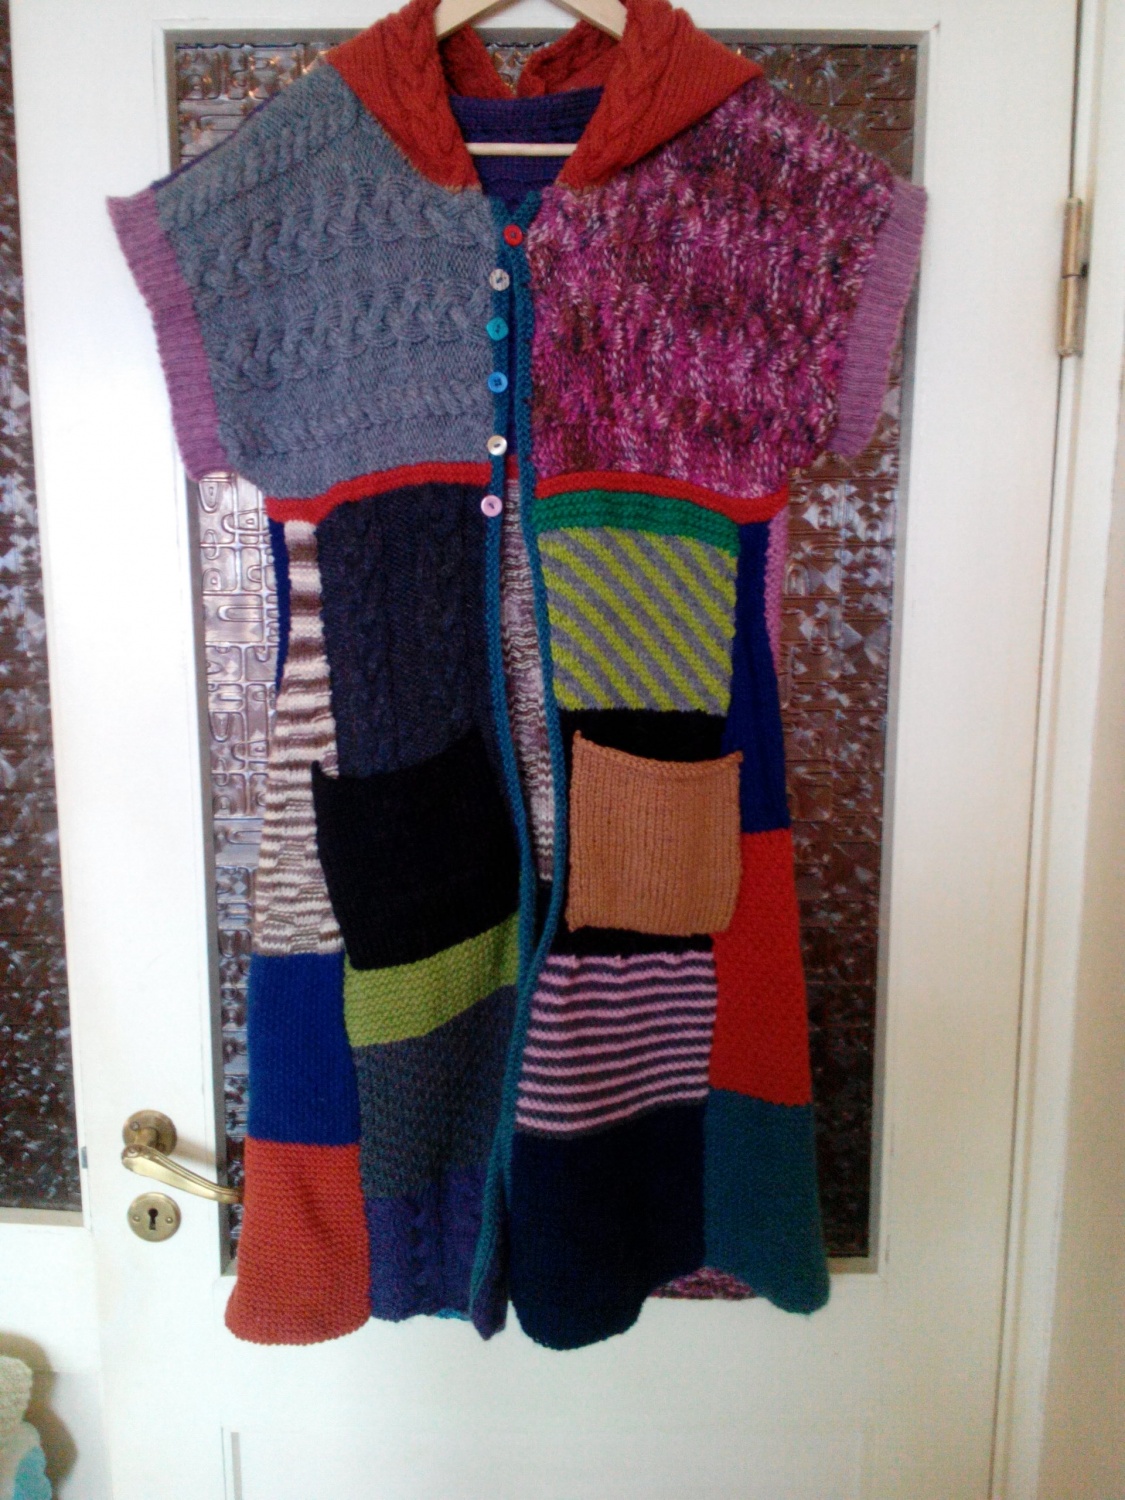
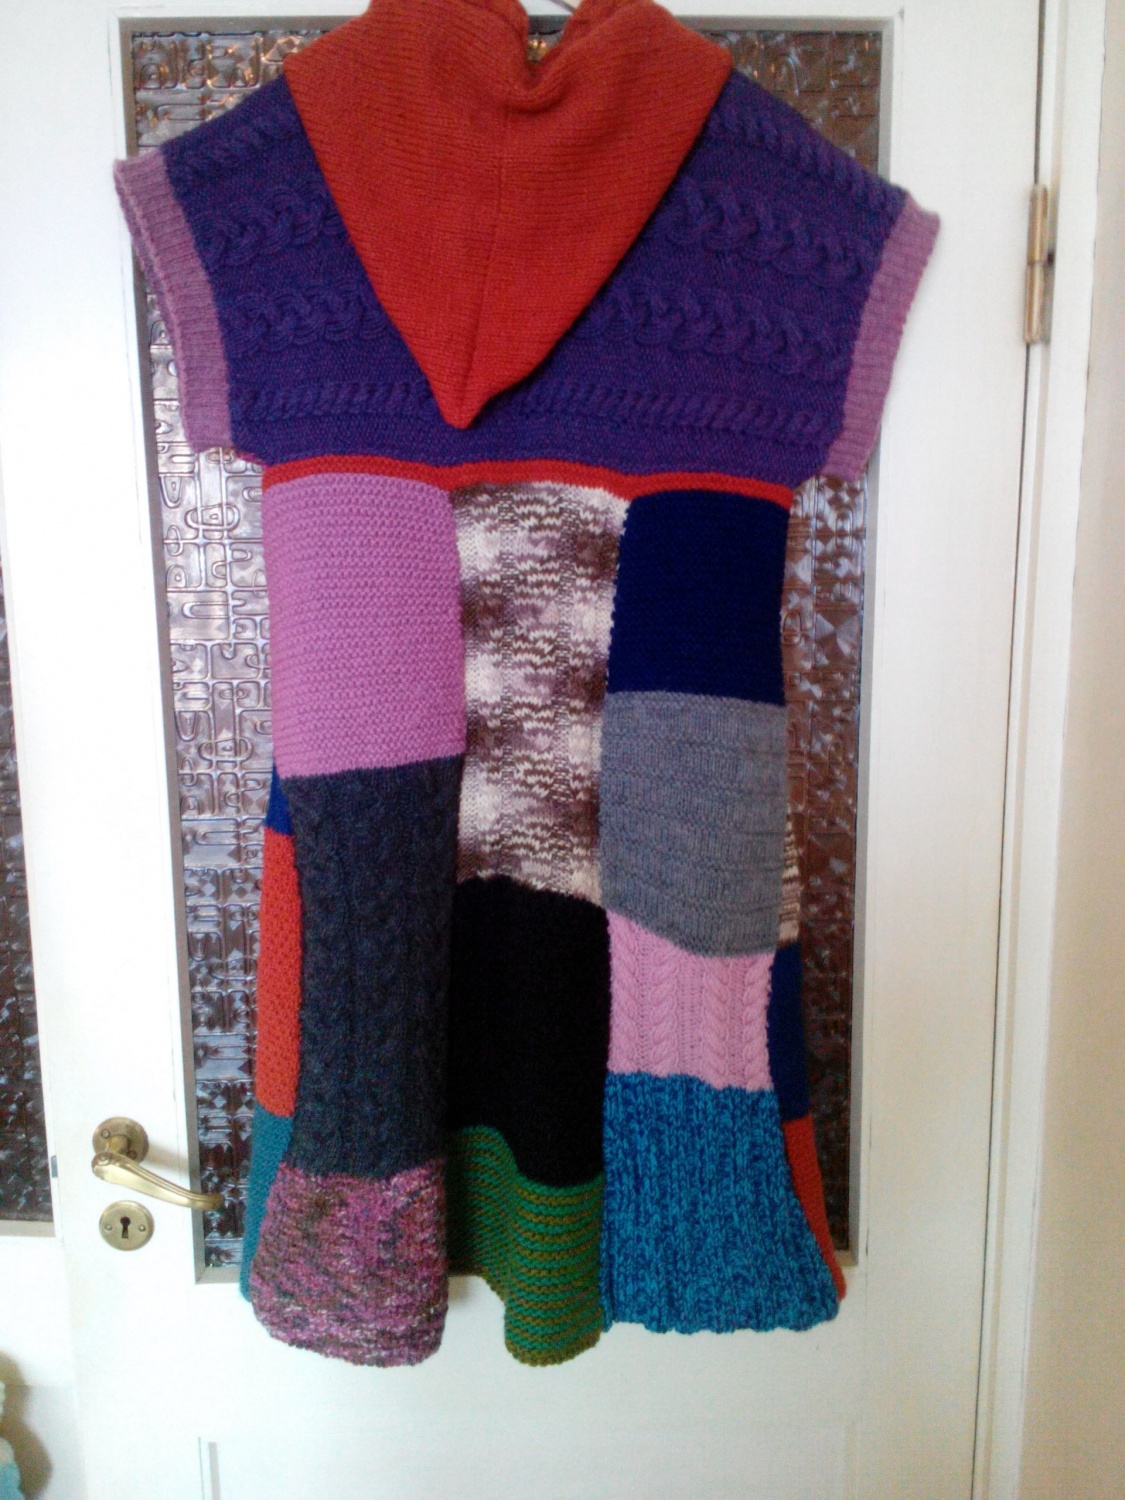
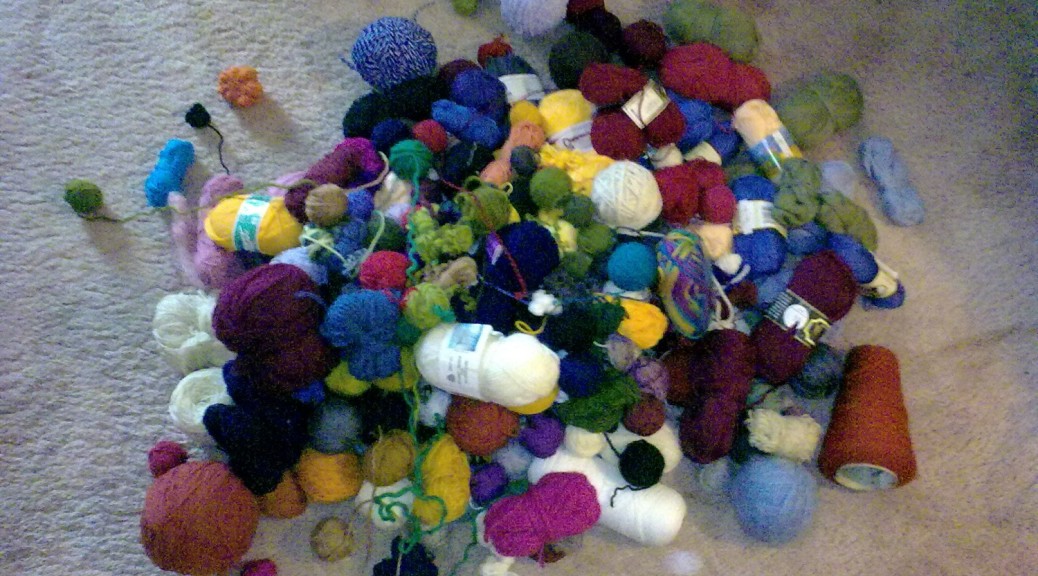
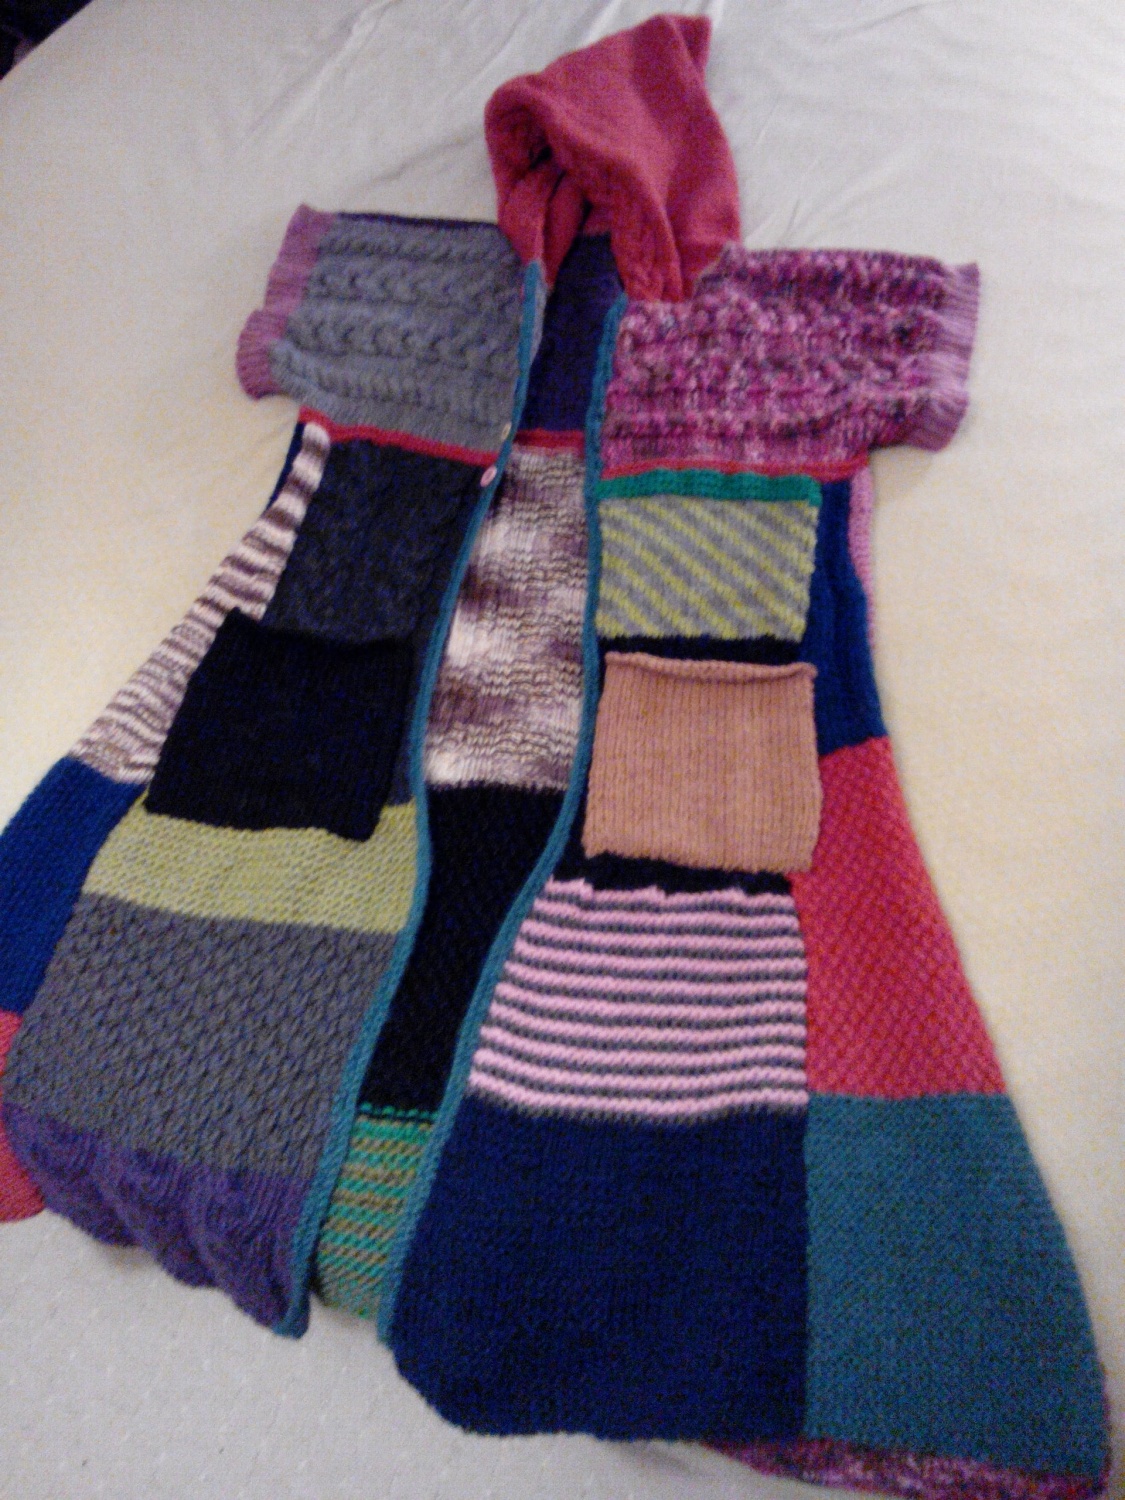
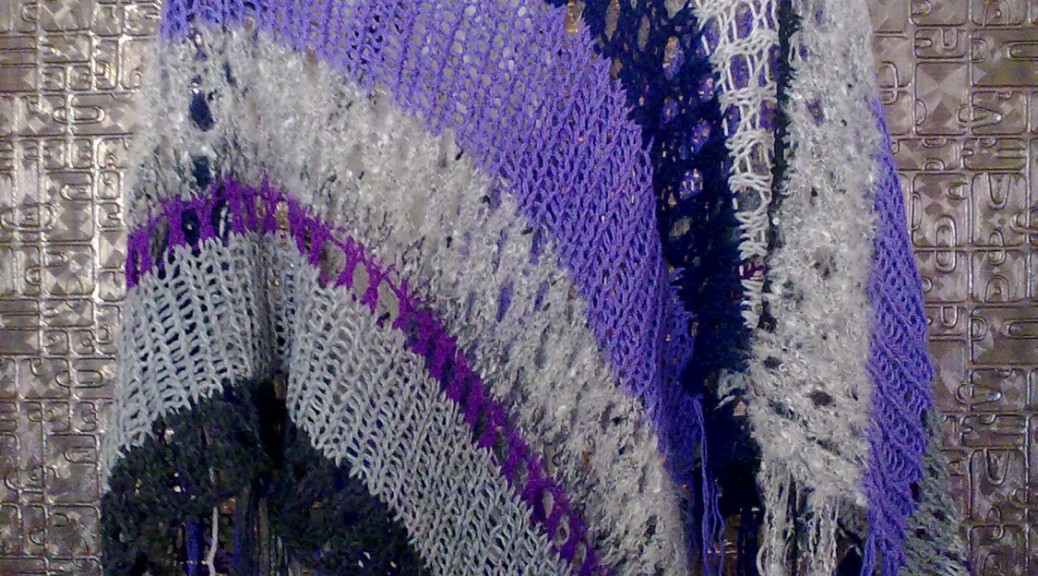
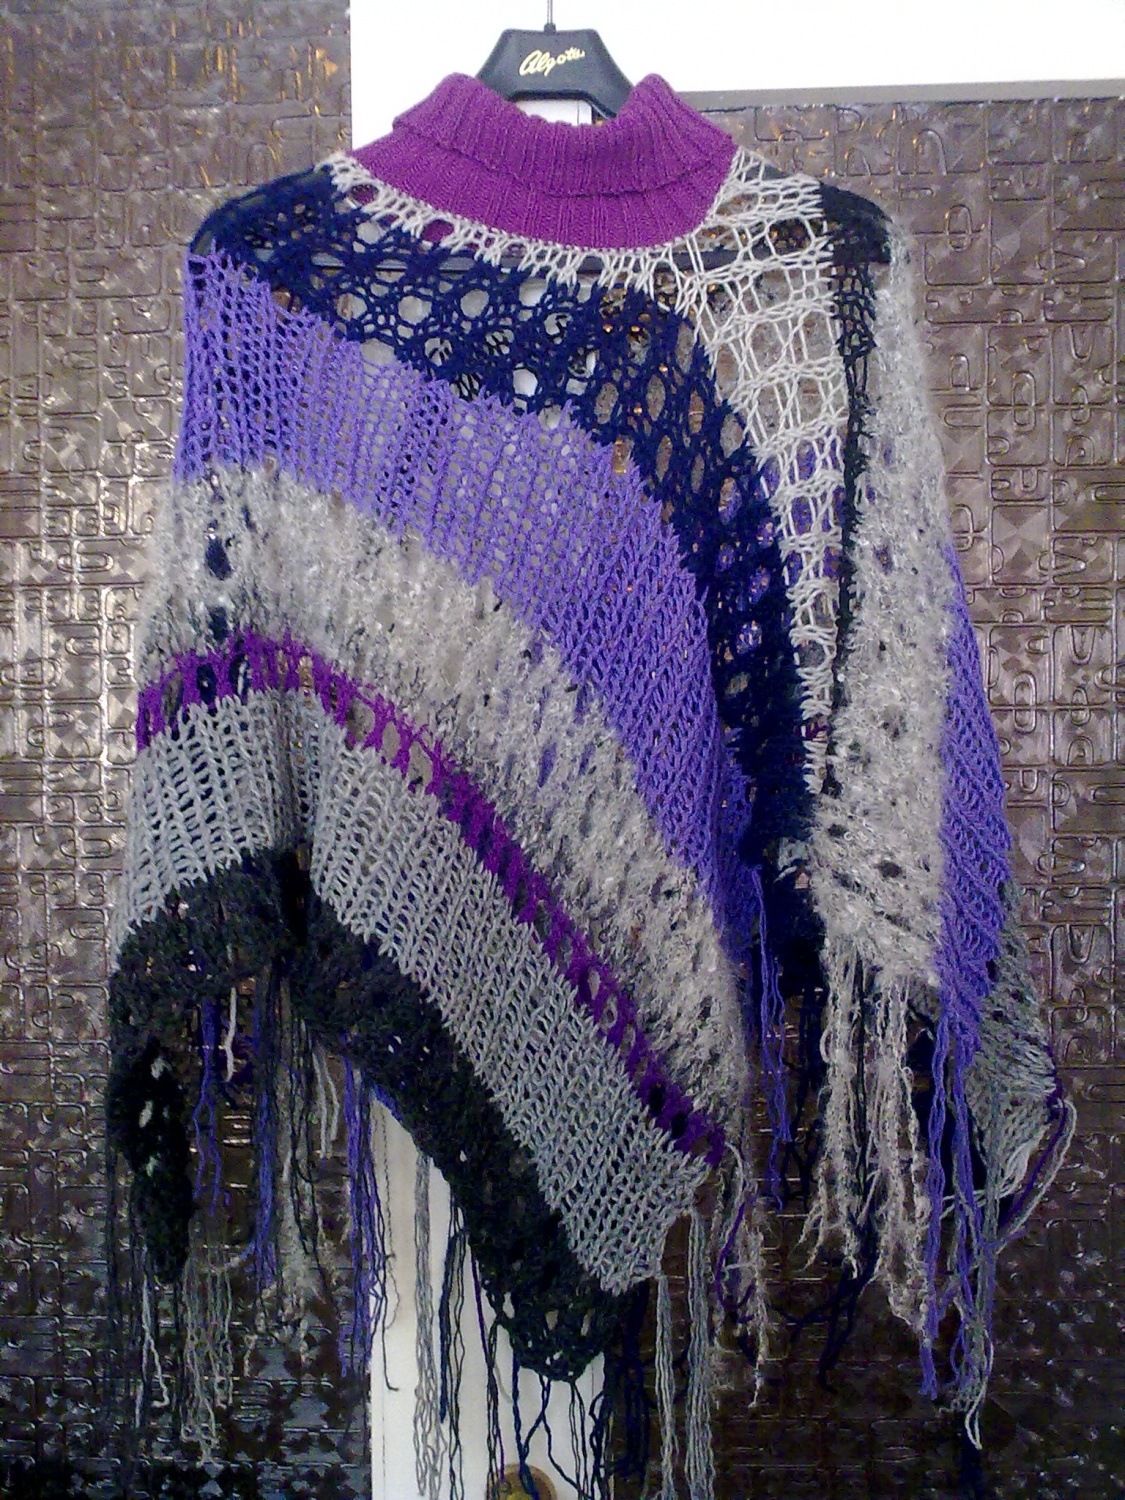
I’m currently working on some new “features” for my blog, a logo and some new headers for my different categories. While we’re waiting, I thought I would add a free pattern for you. In 2013 I knitted this poncho, of course with leftover yarn from my then massive stash. Every Autumn I’ll buy a fashion magazine (when there’s a “trend bible” filled with knitwear), and look through and see if something tickles my fancy =) This poncho was such a project. I cannot for the love of knits find the picture that inspired me, I don’t remember which clothing designer made the poncho I liked. All I remember is that it was in white and different brown colors, striped and with a few different patterns for the different colors.
Anyway, here is the pattern. If you want to download the pattern and print it out, scroll down to the bottom of this post and hit the “download pattern” =).

Purple poncho

Needle size: 9mm/US size 13 (the needle size should be bigger than what is recommended for the yarn, to make the sts look loose).

Gauge: 18sts approx. 20cm

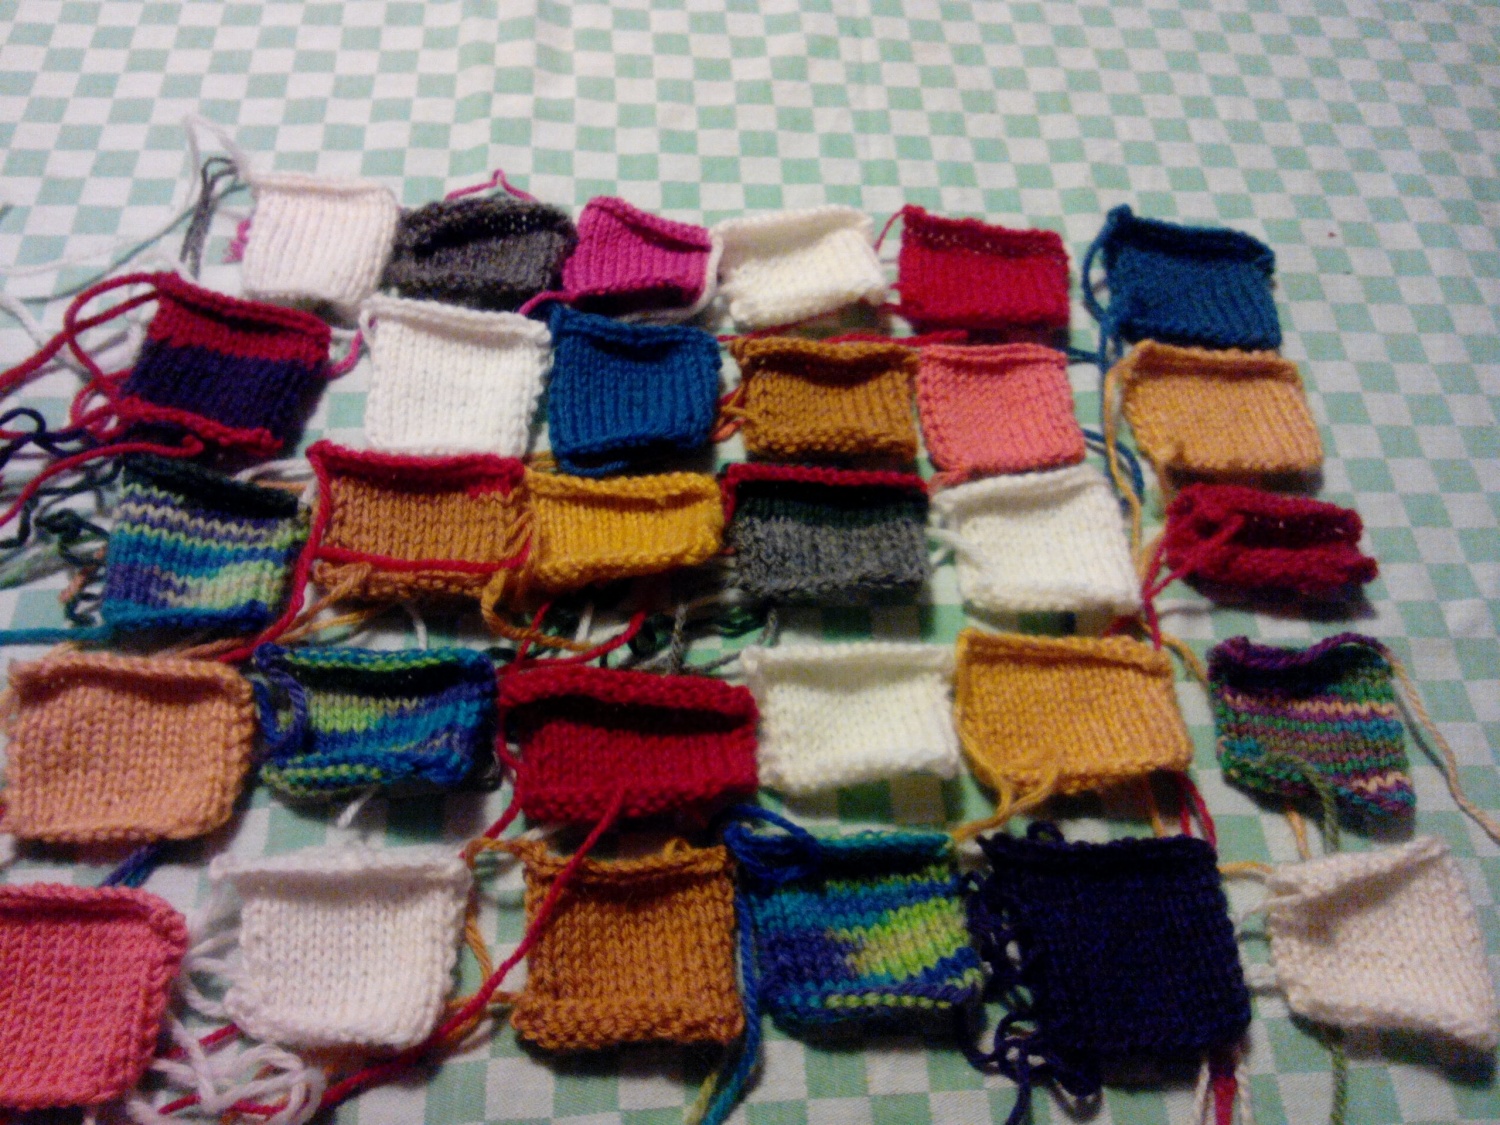
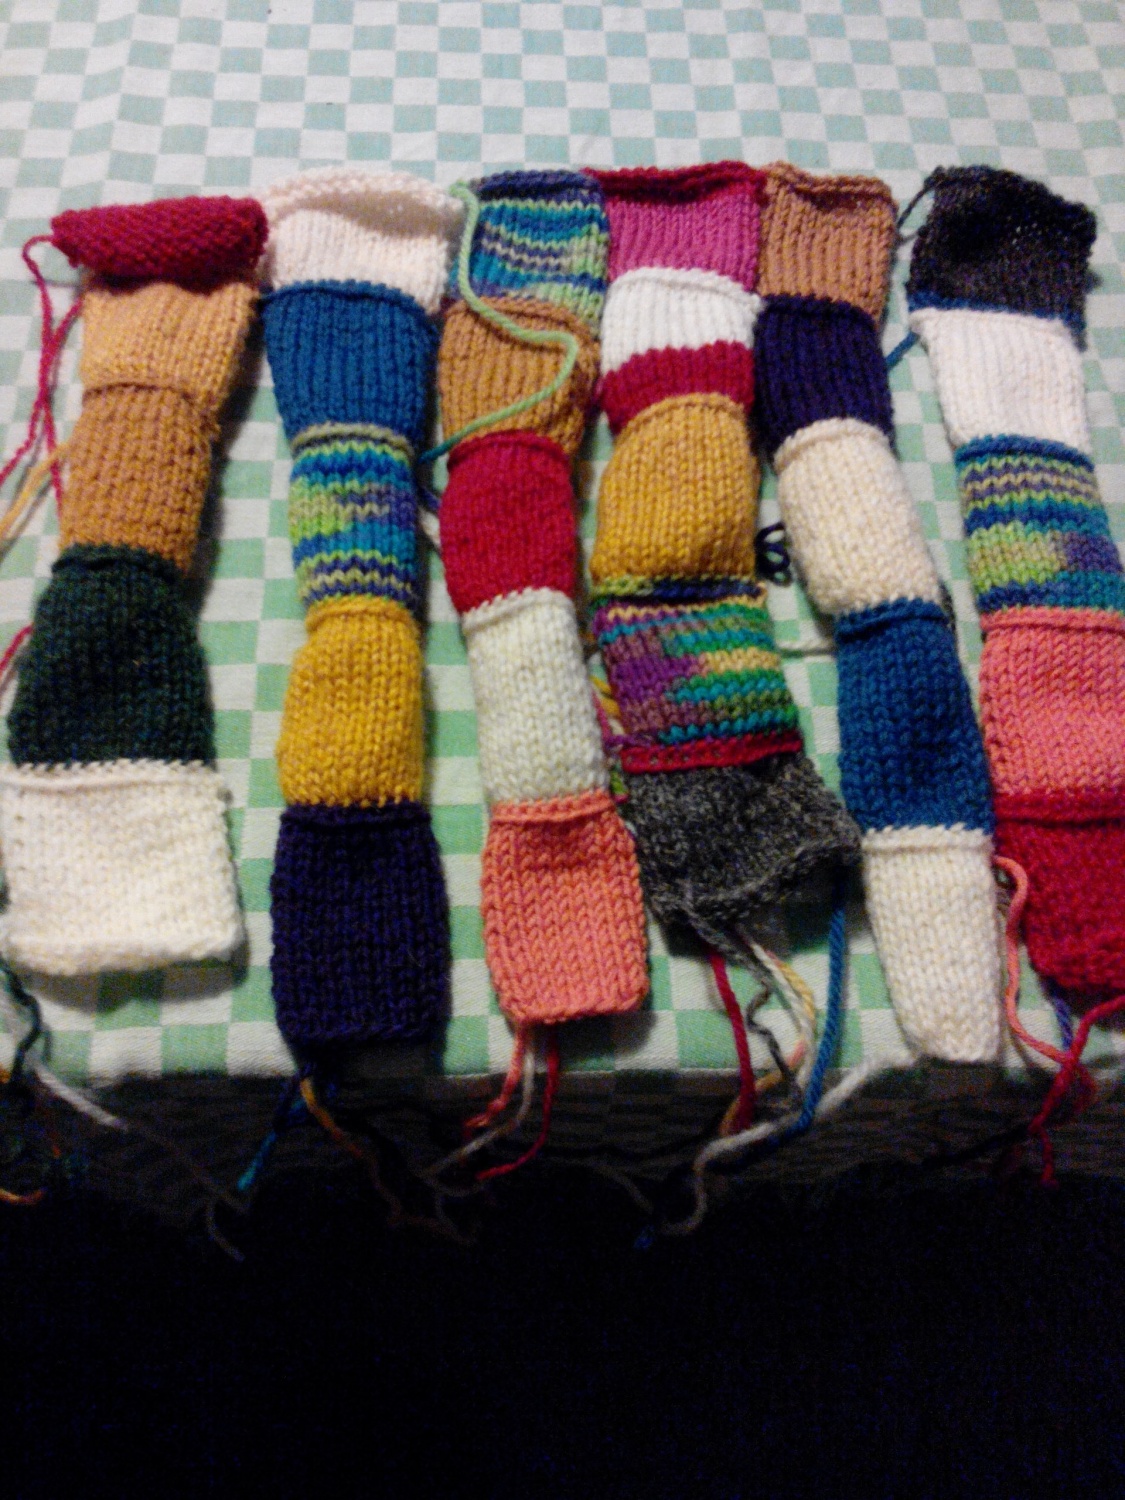
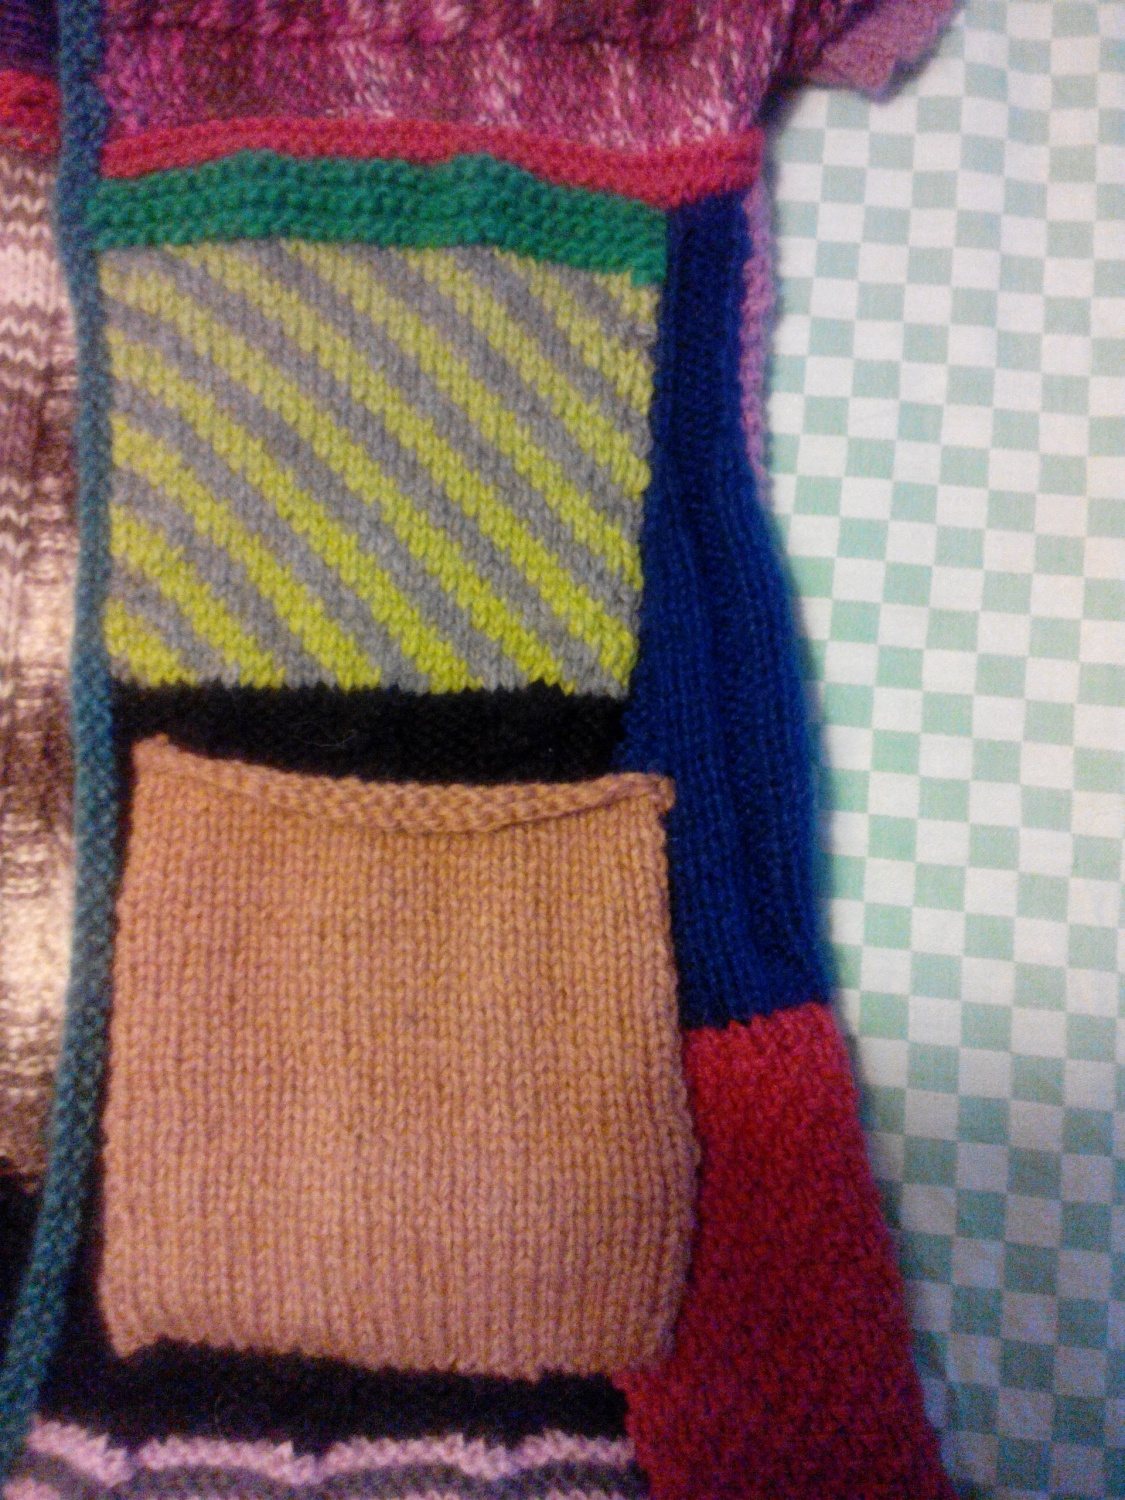
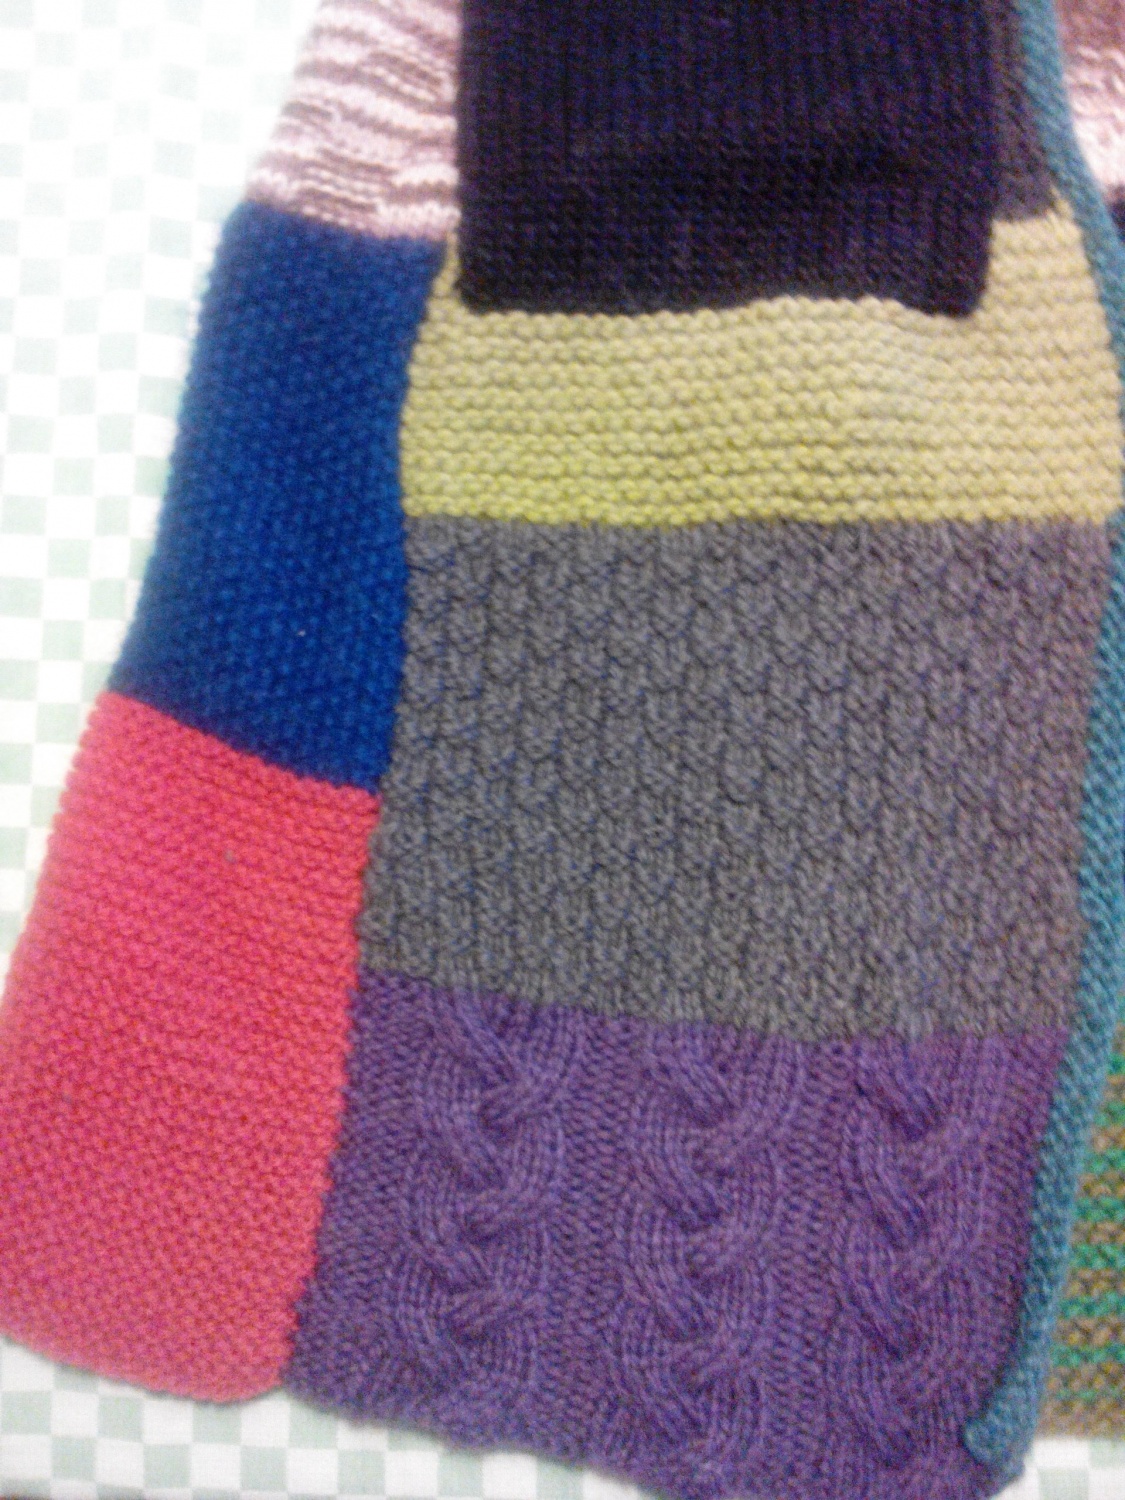
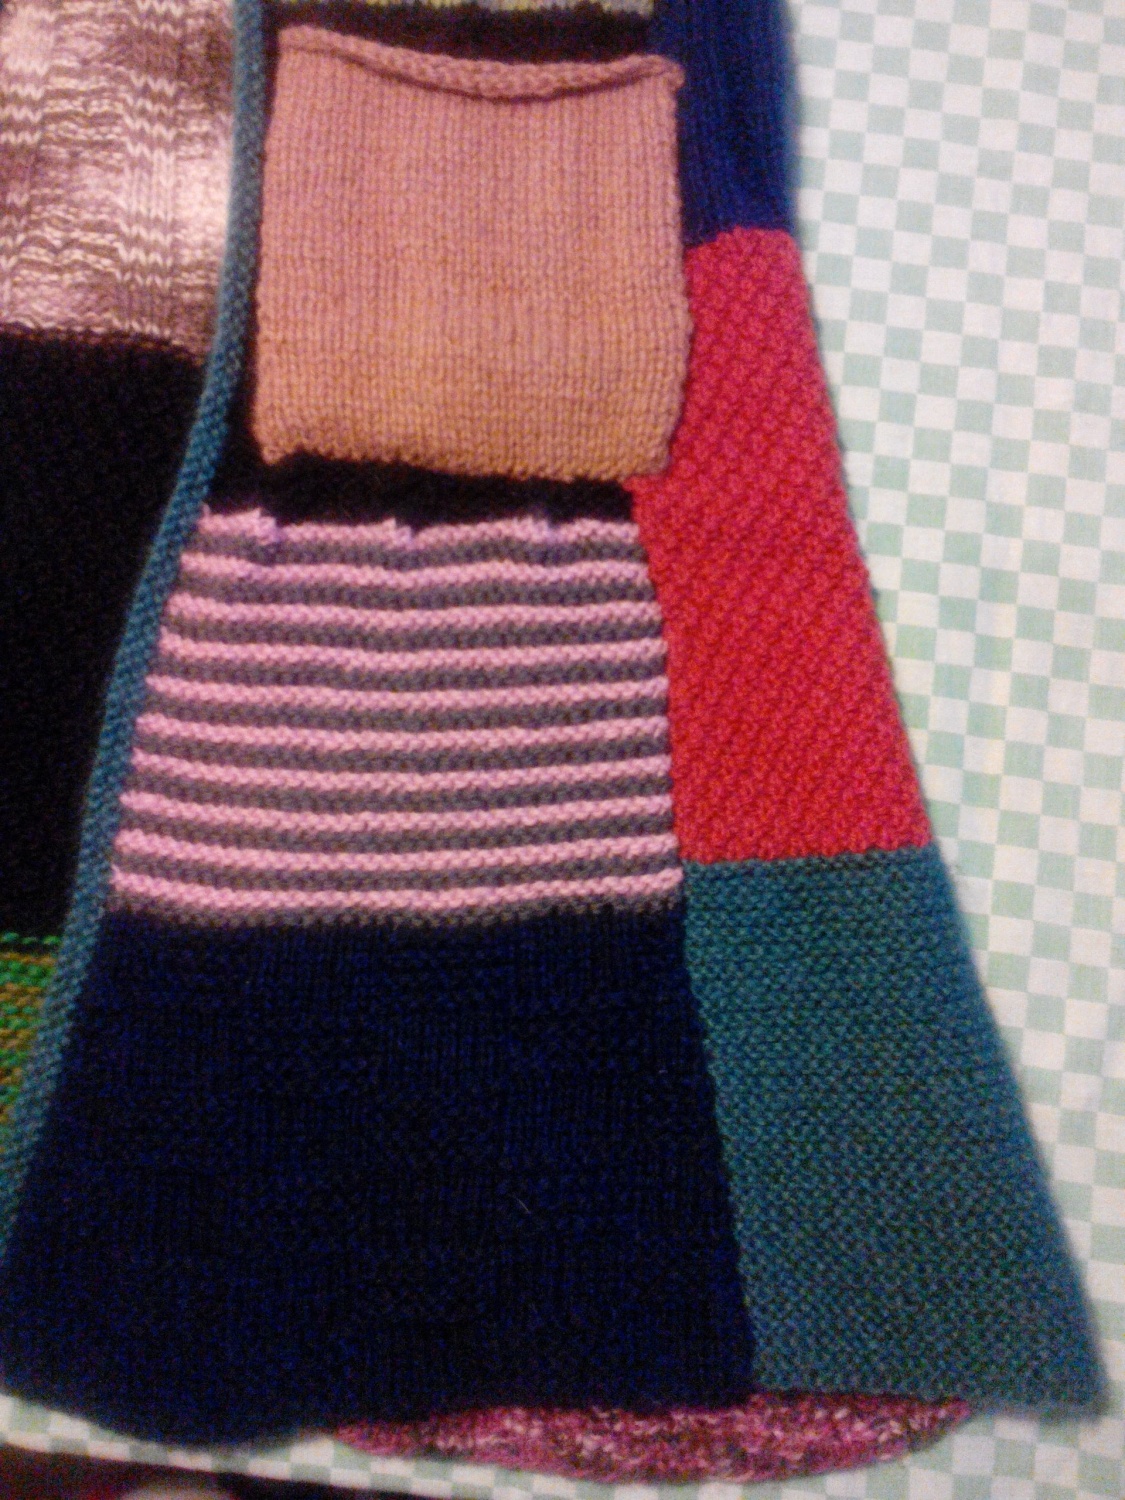
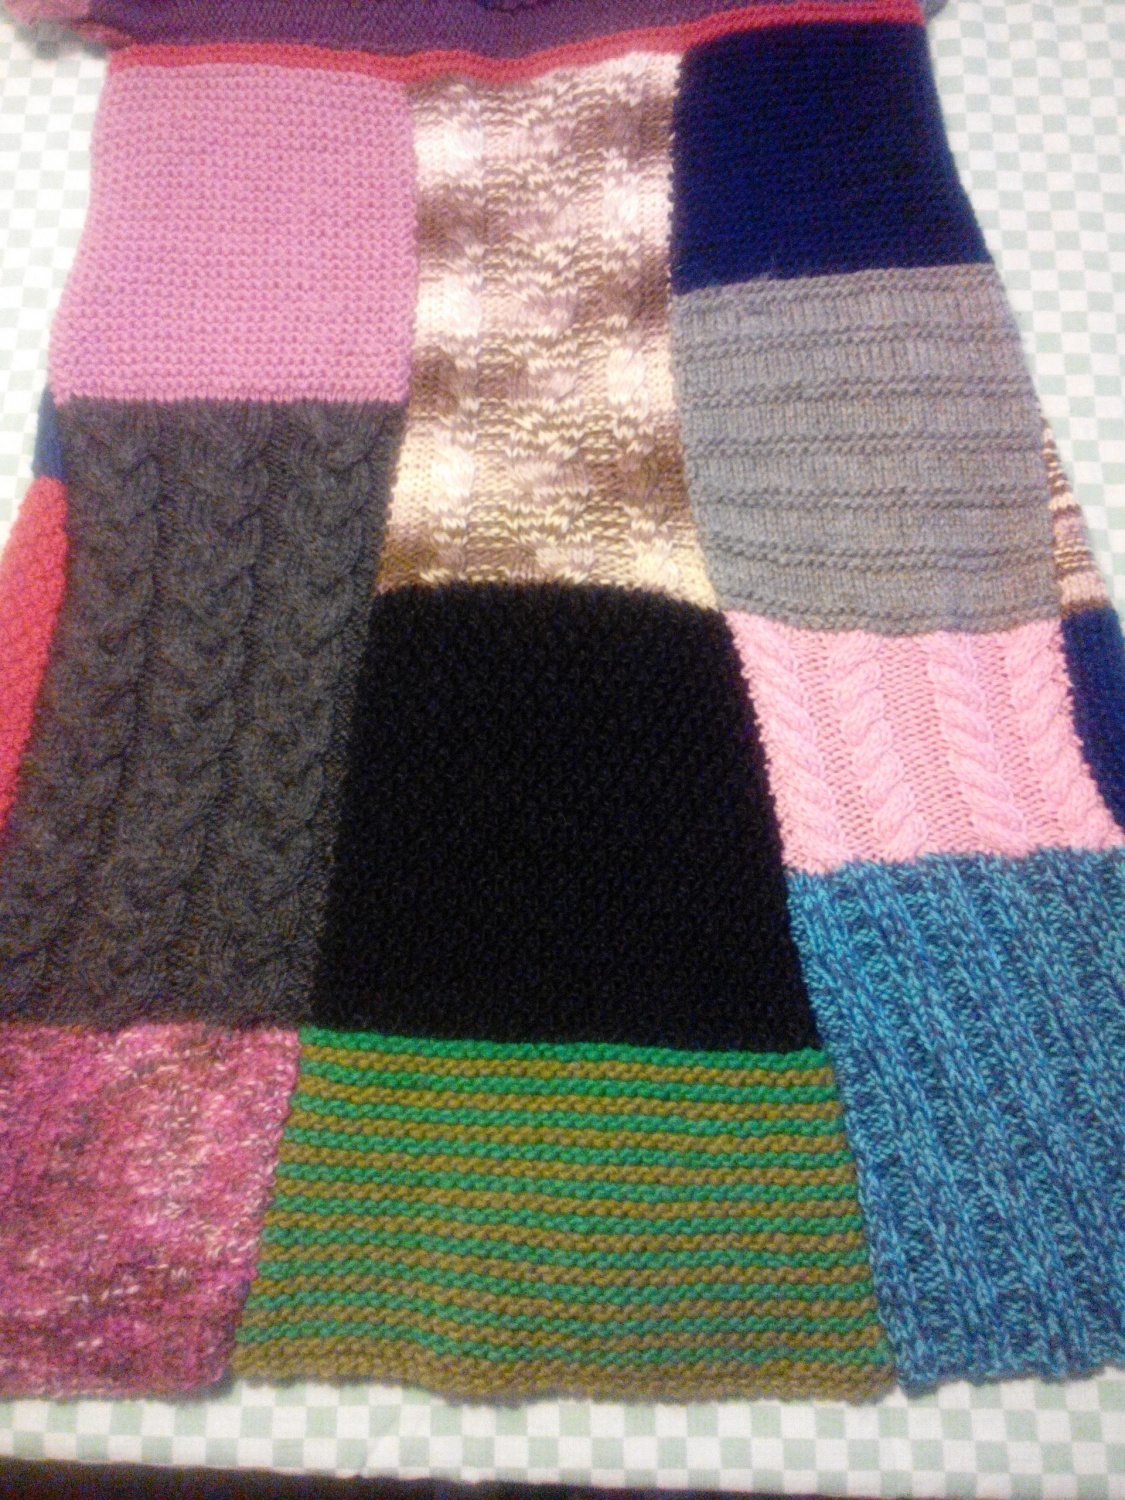
Yarn: This poncho is knitted with leftover yarn from other projects. You can use any kind of yarn you want. This poncho is knitted with:
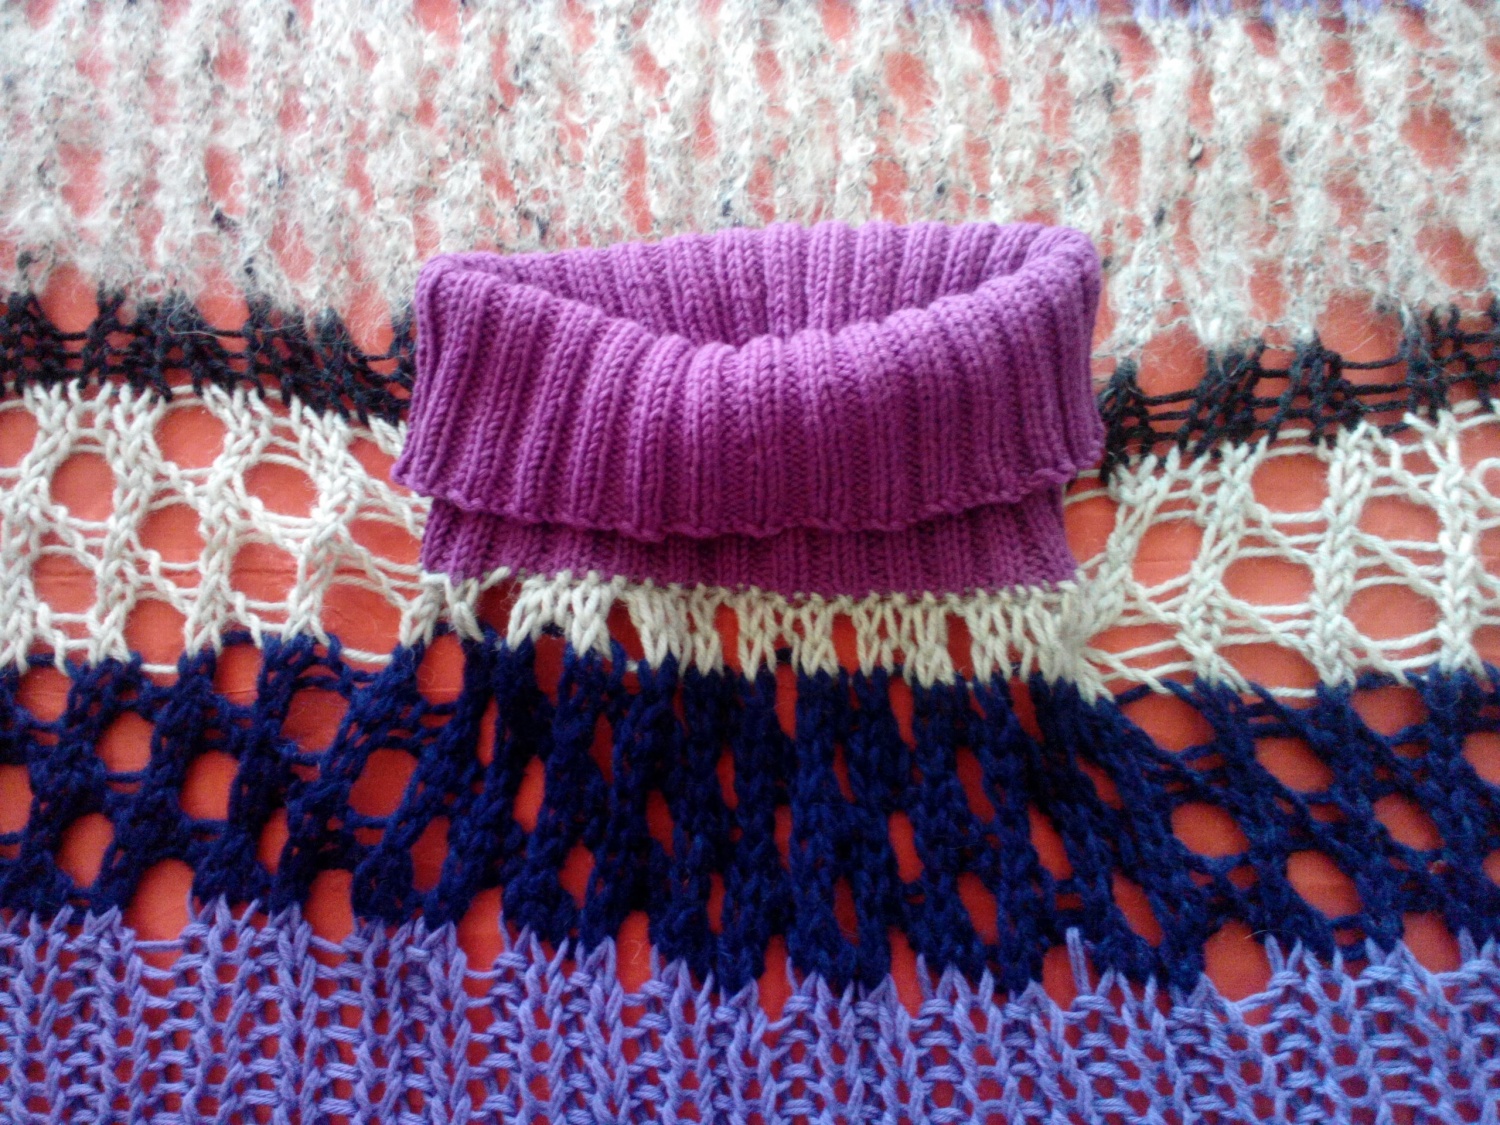
Lerke – the neck (single thread)
Falk -deep purple (single thread, very loose sts)
Fritidsgarn – dark blue (single thread)
Drops Alpaca – dark grey (triple thread)
Lima – medium grey (double thread)
Gjestal bomull sport – medium purple (double thread)
Hegre – light grey (single thread, very loose sts)
Boulcè yarn (single thread)

You’ll need approx. 9-11 skeins of yarn (depending on what type of yarn you choose), whatever is left is used for the fringes. The thinner threads are either doubled or tripled. If you double or triple your threads, remember to keep the “new” thread thinner than the needle size you’re using.

IMG_20150324_124610

Measuring tips: Make all measurements when the piece is laying flat. The poncho measure approx. 92cm across, 104cm long.

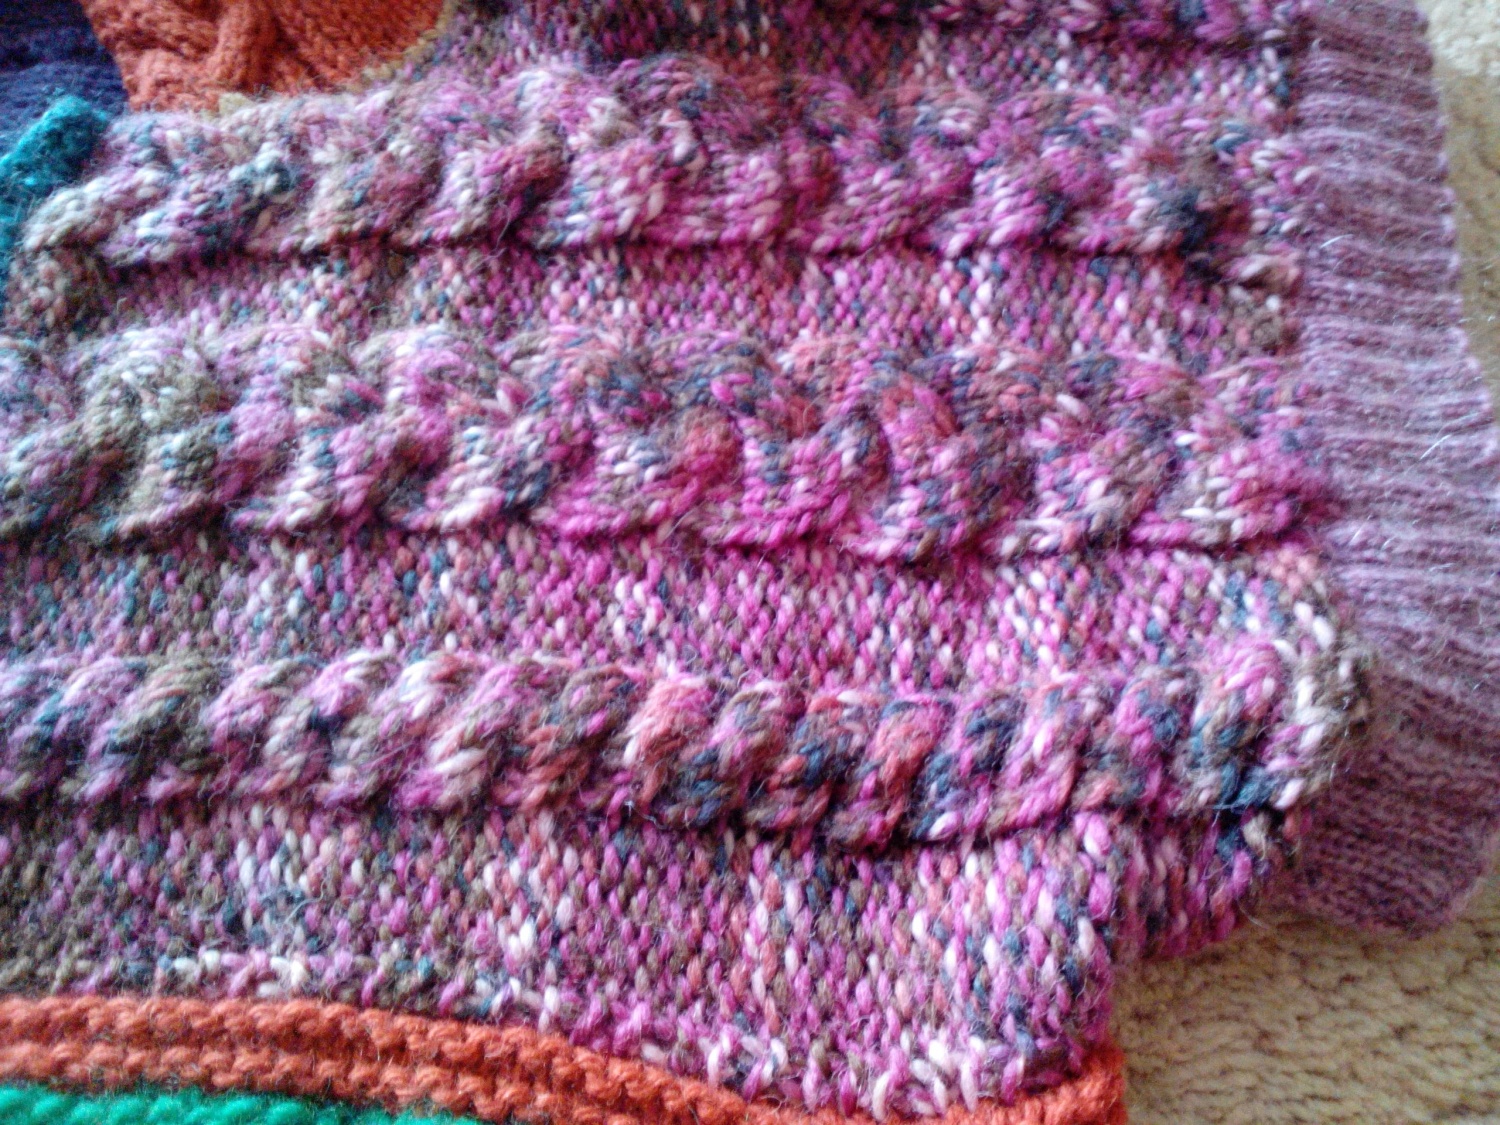
This poncho is knitted in one piece with 3 easy patterns, and the poncho itself is a square. The 3 patterns are underlined. If you start a pattern on purl side, remember to purl instead of knit (and vice versa).
Cast on 80sts (first and last sts are edge stitches, and is knitted on both sides. Do not include them in the patterns).
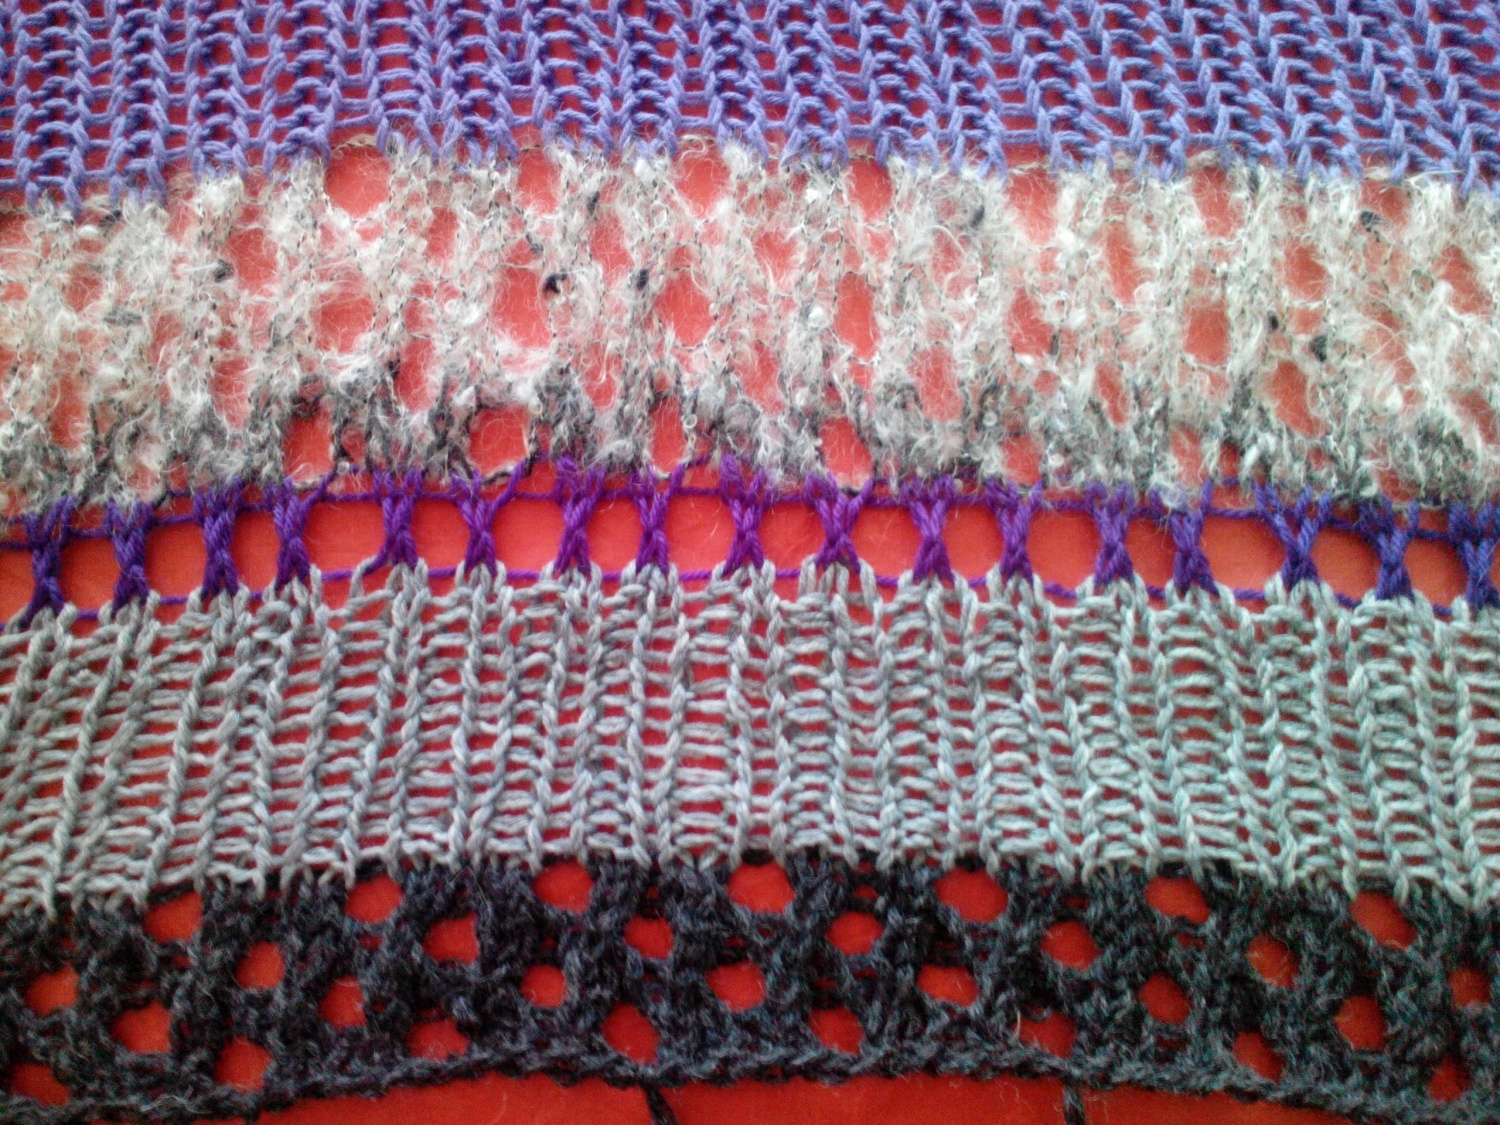
 

IMG_20150324_124224

Pattern 1
Row 1: purl all stitches
*Row 2: *knit 2sts, knit 2sts together, yarn over 1st*, repeat *.* over all sts. last 2sts knit. (purl on purl side, knit on knit side)
Row 3: purl (purl on purl side, knit on knit side)
*Row 4: *knit 2sts together, yarn over 1st, Knit 2sts*, repeat *.* over all sts, last 4sts knit 2sts, knit 2sts together. (purl on purl side, knit on knit side)
Row 5: purl (purl on purl side, knit on knit side)
Row 6: repeat row 2
Row 7: purl
Row 8: repeat row 4

Pattern 2
Change color.
Row 9: *purl 1, knit 1* over all sts
Row 10: *knit 1, purl 1* over all sts
Repeat row 9 and 10 five more time.
Row 21: *purl 1, knit 1* over all sts

Pattern 3
Change color.
Row 22: knit all sts
*Row 23: *purl 2sts together, yarn over 1st*, repeat *.* over all sts. (purl on purl side, knit on knit side)
*Row 24: knit (purl on purl side, knit on knit side)

Repeat these 3 patterns in any kind of order you want, for a total of 59 rows. If you’ve ended a color on the purl side of the poncho, remember that the first row you knit has to be purled.

On this poncho the pattern order is:
3th color change: pattern 1 for 10 rows
4th color change: pattern 2 for 13 rows
5th color change: pattern 1 for 10 rows
**6th color change: pattern 1 for 2 rows
(**:  neckline starts after these first 2 rows)

Row 60: knit 29sts in the pattern you’re doing, then cast off 22sts for the neck, knit the last 29sts
Row 61: knit 29sts in the pattern you’re doing, cast on 22sts, knit the last 29sts (now you have a neck hole).
Row 62-67: continue pattern 1 (a total of 10 rows with the 6th color change, 2 rows on one side, 2 rows for neckline/shoulders, 6 rows on the other side)

7th color change: pattern 2 for 4 rows
8th color change: pattern 1 for 12 rows
9th color change: pattern 2 for 11 rows
10th color change: pattern 3 for 8 rows
11th color change: pattern 3 for 3 rows
12th color change pattern 2 for 8 rows
13th and last color change: pattern 1 for 5 rows
Cast off.

IMG_20150324_124348

The neck:
Pick up 116sts around the neckline with circular needles/4dpn size 4 1/2mm (US size 7), and join (approx. 3sts on needle size 4 1/2mm for every sts needle size 9mm). *Knit 2, purl 2* around over all sts, until the neck measures approx. 14cm. Cast off. Sew in any ends.

Fringes:
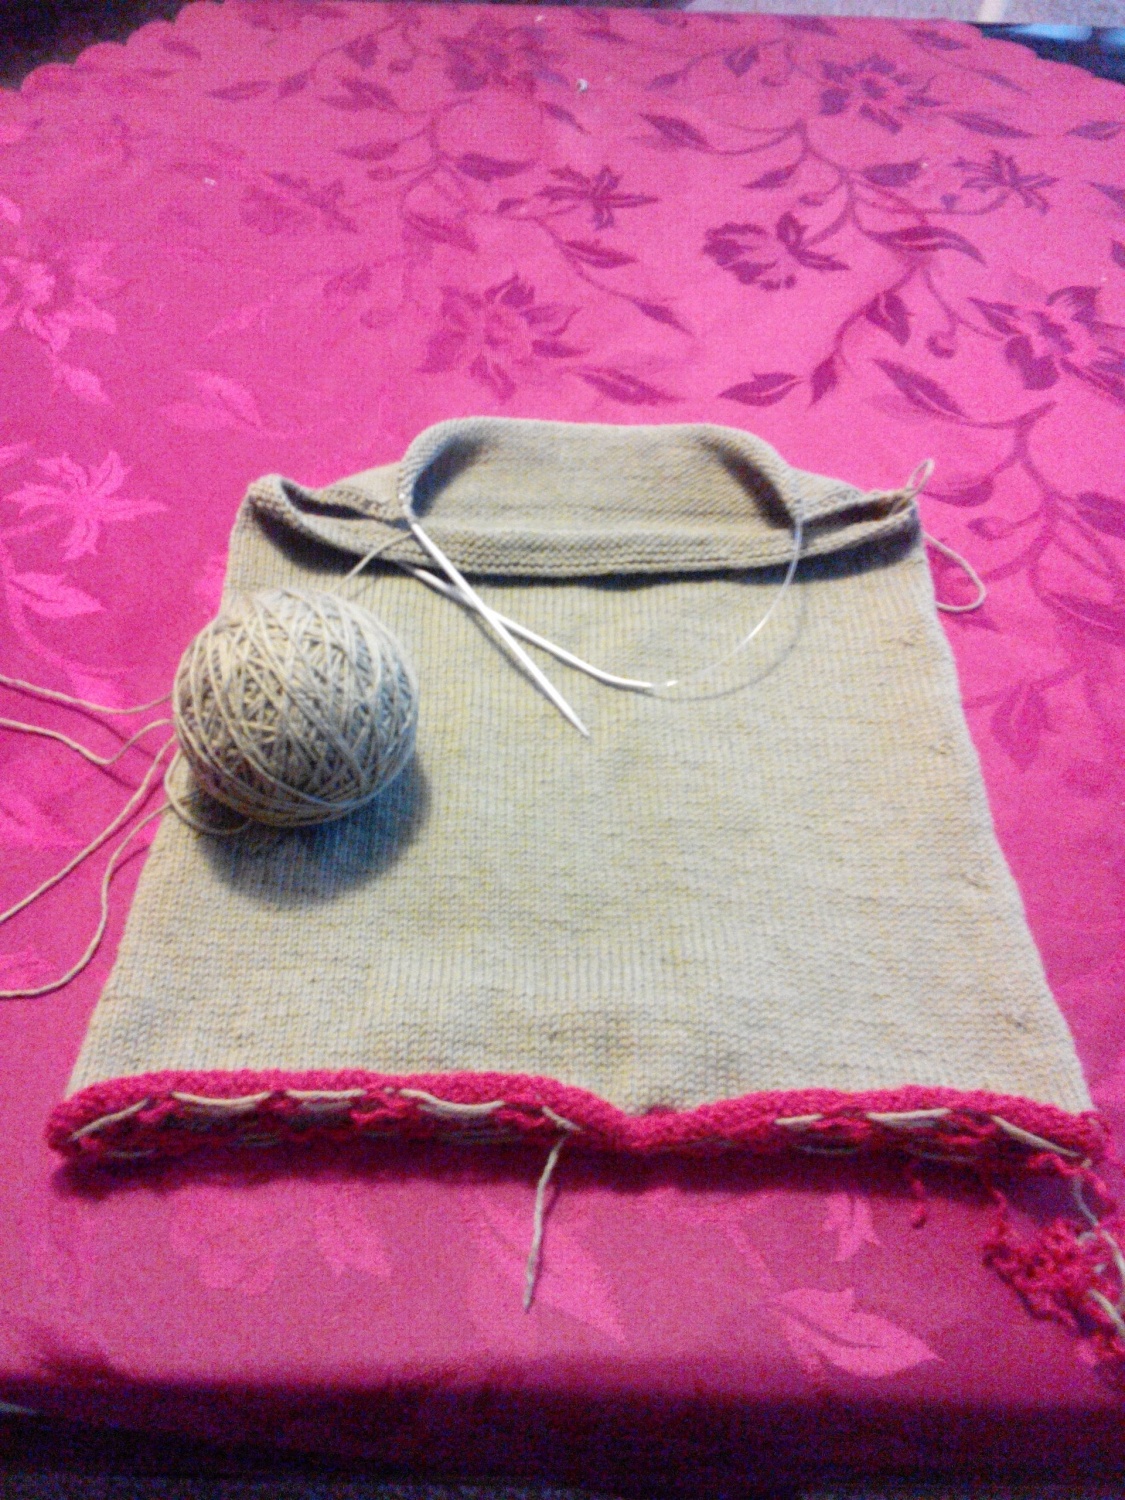
All loose ends on the poncho are used as fringes, so don’t sew them in or anything like that. Add fringes with the yarn you have left. Cut them 40cm long, and loop them through the edge sts, all around the square.


DOWNLOAD PATTERN


A World of Socks!

I suffer from cold feet syndrome (it’s not really a syndrome, I just have cold feet most of the year). Probably because I smoke, at least that’s what people keep telling me. So I have my arsenal of knitted socks, because I get really grumpy if my feet are cold. All my socks are knitted with leftover yarn, I like having colorful socks that match/mismatch in their own quirky way.


IMG_20150302_125326

This socks are knitted with needle size 4 1/2 (US size 7), and a mix of wool yarns. The red and the black is alpaca wool. I’ve also patched one of the socks, I only throw away my socks if they are unfixable.


IMG_20150302_125658

These socks are knitted with needle size 4 (US size 6), and is a mix of every little ball of yarn I had at the time I made them. They have also been patched, and they are my absolute favorite pair.


IMG_20150302_125807

These socks are knitted on needle size 5 1/2 (US size 9), with leftover fritidsgarn yarn. They used to be the sweater on this cover, but when I had finished it, I didn’t like how it looked on me. So instead I knitted the model 8 sweater (from the same booklet) as a gift, and these socks.


IMG_20150302_130220

These socks are knitted with needle size 6 (US size 10), the green is Eskimo yarn, and the felted white parts also. I mistakenly machine washed them once, and because of that I have to fix the top part (which had been felted). I couldn’t get them on, because they were too tight. Luckily it’s an easy fix, and now they fit perfectly.

IMG_20150315_145654

These socks are knitted on needle size 4 (US size 6) with a mix of wool and mohair yarns. The color part of the socks are knitted with double thread, white and a color.


IMG_20150302_125510

These socks are knitted on needle size 3 (US size 4) with alpaca wool. The soles of feet are starting to felt, which I don’t mind at all. They are still super soft, and it makes it easy to sew on patches when there are holes. They go just below the knees.


IMG_20150302_125738

These socks are knitted with needle size 3 (US size 4), the pink is alpaca wool and the grey is pure wool. They go just below the knees, and have a cute ruffle on the top. I used this pattern for the ruffles on the top.


IMG_20150302_125426

These socks are knitted with needle size 4 (US size6), and they are mostly knitted with embroidery yarn. My boyfriend’s father’s mother (that was a mouthful!) had a bag full of embroidery yarns and threads, which I was fortunate to get a hold on. The socks goes just above the knees.


ble 088

These socks are knitted with needle size 3 (US size 4), with a soft wool yarn. I used this pattern  (which is free on Ravelry), and added some traditional Norwegian patterns for the rest. They go just below the knees.


Hot tip: 

When it comes to socks, I hardly ever follow the patterns for the foot part. I always knit the foot part of my socks snug and tight, so when they stretch they are a perfect fit. It always annoys me when the heals ends up way up on my ankles. This is of course a personal choice. I also always knit the heals with double thread to make them more durable.


Squared Legwarmers!

Yesterday I finished a new pair of legwarmers for myself.

There are a few ways you can make these legwarmers, and I’ll try and make it easy for you to do (bare in mind, I have never written down any patterns, so I’ll just try to explain).  First off, you have to find  your bulks of leftover yarn. In my case I found all the yarn I had suited for needle size 4 (US size 6), and made a swatch with 14 stitches (that includes 1 edge stitch on each side for sewing), and knitted 16 rows (that includes the cast off row). I then measured it, and the square was approximately 5cm both ways (width and height). Then I measure my leg to see how many squares I would need horizontally.


IMG_20150310_213249

Since I had an unknown amount of yarn length, I decided to knit the squares separately and sew them together afterwards. This can of course be done differently. If you know the length of your yarn and how you want your colors, you can easily divide your yarn (like one would when knitting f.ex. intarsia) and knit full length rows of squares before sewing the rows together. Either way, there is some sewing involved. I also prefer to knit the squares separately, so I can sort out the different colors afterwards.


IMG_20150310_180113

I then set out to make my vertical rows. I decided to not “hide” the cast off row, so I sewed them together in the back loop on the cast off stitches and the cast on loops. This is of course a personal choice. If you want a more seamless finish, that is your choice.


IMG_20150311_170658

As you can see from this picture, I left an open space between row 3 and 4 at the bottom. I did that because I prefer my legwarmers to be slightly wider at the bottom. Again, this is a personal choice. If you prefer to have them straight, sew it all together. If you, like me, want them a little wider, you should knit squares that decreases. I made 2 squares for this purpose. The bottom one started off with 14 stitches, and I decreased 2 stitches every 6th row, and I knitted 16 rows like the other squares. The second square started off with 10 stitches (to match the cast off row from the first square). The second square started to decrease on the second row (4 rows from the previous square + 2 rows on this new one = 6 rows), and I continued to decrease every 6th row until I had 4 stitches left. On the 6th row I knitted the 2 middle stitches together, leaving me with 3 stitches. I knitted 3 rows with 3 stitches, and finished off knitting the 3 stitches together on the 4th row. You can knit it as long as you prefer.


IMG_20150312_012813

I had decided I wanted a row of buttons on the outside of my legwarmers, so after I had sewed all the squares together, I picked up 48 stitches along both sides and knitted a rib finish (knit 2, purl 2). I made 5 holes for buttons on one side, on one legwarmer on the right side and on the left on the other. On this picture you can see that the bottom legwarmer shows the inside.


IMG_20150312_154254

IMG_20150312_155734

I also wanted to have a top and a bottom finish, and I decided to have a rib finish at the top and a garter finish at the bottom. The top part is knitted all the way around. I picked up 13 stitches in the back loop of the cast off IMG_20150312_194606stitches on each square, and also picked up 10 stitches on the ribbed band where the buttons would be sewed on (88 stitches total). The ribbed band with holes is “hanging loose”. On the 4th row I made holes for a ribbon, by knitting *knit 2, purl 2, knit 2, cast on 1 stitch, purl 2 together* all the way around. The bottom has 4 rows, knitted with garter stitches. I picked up stitches in every cast on loop, and picked up 10 stitches on all 4 bands. The 4th row is the cast off row.

Finished product:

IMG_20150313_152555

IMG_20150313_152607


Sleeveless Coat!


this bookIn 2013 I got this book for Christmas from my boyfriend’s mom, I had it on my wish list =) For her birthday the following year I made her this absolutely beautiful coat, because I had so much white yarn laying around. Making the coat was very time consuming, but it was worth the work! It’s a puzzle making this kind of IMG_20150309_143346patchwork coat, using different needle sizes for the different types of yarn, making the swatch samples the right size, sewing it all together. The end result is in this post. Not as glamorous looking as the picture from the book, I did not have a sexy wind or a beautiful ocean at my disposal =P

IMG_20150309_143427After the work was done, I realized it actually made me a little jealous, I wanted one too! As a pale Northman, I look kind of dead in white. Luckily I like colors, I can be quite colorful. So instead of making myself a white coat, I drew inspiration (from the same book) from this poncho.


The swatches/squares vary from cable patterns, to moss stitching, double moss and garter stitching. I used yarn like Eskimo, Kitten Mohair, Alaska, Nepal, Silja, Falk, and a whole bunch of other yarn (whatever was laying around basically). The needle sizes were 5 to 9 (US size 8 to 13), depending on the yarn. I’m guessing there’s about 1500g of yarn in total, maybe more maybe less.

The top part of the coat (the yoke) is knitted in three pieces (2 front pieces, 1 back piece), all pieces knitted with the same cable pattern.  The back piece is 58cm long and 25cm wide. The front pieces are 26cm long and 25cm wide (I’m a size Large). The ribbed finish on the arms are 3cm.

4front right

4front left


back top


There are a total of 28 squares, that does not include the pockets or the hood. The longest measuring 34cm, the shortest only 3cm.

IMG_20150309_175940

Left side (without the top yoke) is 20cm IMG_20150309_175929wide on the top, and 42cm wide at the bottom. Right side is the same as the left (of course =P). Back side (without the top yoke) is 52cm on the top, and 76cm at the bottom. The coat measures IMG_20150309_18000596cmIMG_20150309_175915 (from shoulder seam to bottom).

IMG_20150309_180058


The final result is this colorful piece of work, I’m actually very proud. Specially since I’ve made two of these now (the other being the white one).

front

back


Zombies!!!

I have mentioned that I am a horror fan in my “Old Classics Never Die” post, it is by far my favorite genre whether it’s movies, TV shows, comics, books, any kind of art. We all find our thing at some point in life, I found mine very early. I was in primary school when I started borrowing my dad’s Tales from the Crypt comics (Iskald Grøss in Norway), my favorite TV shows as a kid was Eerie Indiana and Are You Afraid of The Dark which was shown on Norway’s TV2 (we didn’t have cable TV until much later). The first horror movie I saw was Deathship, I was 8 years old and that movie gave me nightmares. There are many other things I like too, horror is just my favorite of all the things I like.

When it comes to monsters (non human living baddies), I hold zombies the highest. There are so many fun things being done in the zombie category; fast runners, slow walkers, cursed zombies, intelligence, hybrid zombies (zombies mixed with other elements, or sick people with attributes for the zombie world) etc. A few years back, my uncle KJ got me this awesome ZOMBIE COOKIE JAR, which I use for cookies and Halloween candy.

IMG_20150221_142339

I’ve wanted a zombie messenger bag for a while now, and I’ve finally gotten around to it! I used my cookie jar as inspiration and of course leftover yarns. I started at the bottom, and knitted on circular needles with red (the blood), and continued with the zombie green.


IMG_20150222_150712

I decided to not knit the mouth, nose, eyebrows or eyes. Instead I embroidered it on after (I really do need to practice on my embroidery skills).


IMG_20150226_142050I also knitted a tiny piece of brain, and sewed it on so it looks like there’s a hole in the head where some brain is coming out. I’ve also sewed in inner lining (in green of course), so it doesn’t stretch to the unrecognizable when it gets some weight in the bag.


I’m very satisfied with the end result, I finally have my zombie handbag! =D

IMG_20150227_141136

IMG_20150227_141226


Ølklapper – Beer Clapper

First off, beer clapper is not a real name for it. The Norwegian word ølklapper on the other hand is for real! I learned it on Monday (Feb. 16th), I had honestly never heard of this concept, and I was pleasantly surprised when I found out what it is. It is a beer bag, a small beer bag you hang around your neck so you don’t have to carry your beer around. This allows you (when you’re at a concert/festival) to clap/applaud after songs, because your hands are not clammed around a glass/can/bottle of beer! =D How awesome is that!

I googled “ølklapper”, I also googled “beer bag”, “knitted beer bag” and “beer clapper”. The English words gave disappointing results, ølklapper gave good results (both articles, interviews and a lot of fun pictures).

Anywho. I was talking to one of my aunts (auntie K), and she had this special order. If I would be so kind and make 2 beer clappers for her and her husband. And of course I couldn’t resist, I mean I have never made a beer clapper in my life! =P

I decided to make felted beer clappers, felted items do not stretch when it gets some weight in it. I also decided to practice my embroidery skills (which I have little of, except cross stitching). I have also made removable straps so they can be replaced if they are too short/long, too itchy, or for whatever reasons.

IMG_20150219_171657IMG_20150219_171635The left beer clapper says “does your mother know you’re here”, the right one says “piss off” =)

Candle Holders

Since I just posted about my new friends The Monsters Vases, I thought it be fitting to show my other jar creations; the candle holders. Most of these have been given away for Christmas, a few I’ve kept for myself. Guess which I’ve kept =P

ble 127ble 130IMG_20141214_135341ble 129ble 128g 001

Not only can these jars be very decorative, it’s also a fun and easy way to try out new patterns (both easy and difficult). =)

So much yarn

Recently (the last couple of years), I have started to gather up an insane amount of leftover yarns. I’m sure all knitters have a secret stash of yarn, just laying there waiting to be thought of.  It’s not all mine though, a few of the ladies in my family have generously given me bags and bags of yarn they no longer have any use for. This does not make me sad at all, I’ve found great joy in the challenge of knitting with mixed yarns. A year ago I also got this book for Christmas, as an inspiration (Knitting and crocheting with leftover yarn). Making wearable unique items with leftover yarn is truly fun, so I’ve actually made several items combining various types of yarn.


Here are a few items I’ve made using all kinds of different yarns =)

ble 093


This poncho I made for myself some time ago, and it’s a mix of cotton- and wool yarn. It’s pretty much a mix of everything. Every colored stripe has it’s own pattern, either ribbed or hole patterns. Knitted with big needles (sz9/US sz13), the poncho was a quick project.


ble 094


Owl hats, both were gifts for Christmas 2 years ago. I combined yarns to get one thick thread, to make them thick and warm. The eyes and beaks are chrocheted, and the perles sown in after.


woot 004


Birthday gift for my boyfriend’s mother. She was the one who gave me the knitting book (at the top of this post), and this long sleeveless coat is from the book. This was a fun and exhausting project. Each patch is knitted with their respected needle size, and then sown together.


take1 002


Inspied by the white coat, I had to make one for myself. I’m more colorful on the inside, so I just went for it with colors. I also added pockets and a hood.